Previously, we have written about using high ISO here, and photographing birds in flight here, but we want to delve more into the subject of birds in flight photography. We actually thought you would never ask! What is it you want to achieve? Do you want a sharp, detailed subject or do you want a blur? We think most of us who aspire to take bird images want images to be sharp, rather than soft. And unless light leves are low, we can usually select settings, especially a fast enough shutter speed, to freeze a moving subject. There are, however, a number of elements of the image making process that help to determine the results we get with out gear.
What are some of the important contributing factors and settings to achive a sharp bird in flight image?
- ISO – how much light you are recording with the sensor
- Aperture – determines your depth of field
- Shutter speed – how long you expose your sensor for to capture the frame
- Long lens technique – panning/tracking subject with lens in hand
- Experience – unbeatable ingredient for the final result
If you look at the simple table below, we have chosen some of our more commonly used settings for birds in flight. Each ISO, aperture or shutter speed value is one stop of light equivalent and are standard values on any digital camera. There are 1/2 or 1/3 values in between each one (ISO, aperture or shutter speed), depending on how you set-up your own camera’s exposure increments.
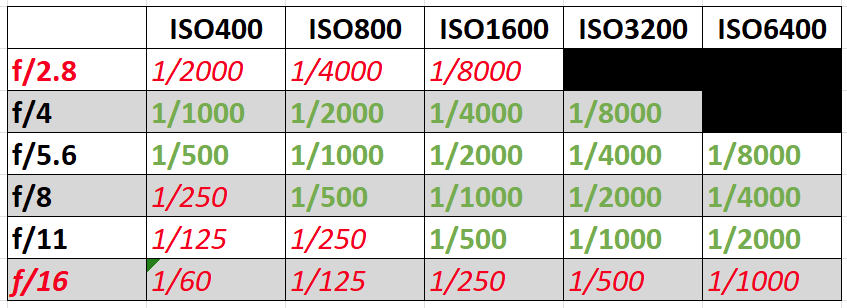
Let’s say you determined that the exposure you need for your subject is ISO1600, f/8 and 1/1000th of a second from the above table. If you want to make the exact same exposure, you can pick any of the combinations from the table by changing either the ISO, the aperture or the shutter speed. So if you think 1/1000th of a second is not enough to freeze the flying bird and you want 1/2000th of a second as a minimum, you can do one of two things:
- Change the aperture for a smaller aperture at the same ISO (ISO1600) for f/5.6 and you will see, that the shutter speed increases to 1/2000th of a second, because the larger aperture (f/5.6 compared to f/8) lets in one stop more light, so you have to compensate by doubling the shutter speed.
- The other option is to change your ISO to a higher value, ISO3200 in this case, to allow the sensor to capture double the amount of light to increase your shutter speed to compensate for the extra light capturing on the sensor.
This is called the law of reciprocity, where to get the same result, where by changing one of the three elements in the exposure triangle (shutter speed, aperture and ISO) you have to change one of the other two elements to compensate. By scanning through this table you will see the different ways to compensate.
The exposure triangle is an important friend in photography. If you master it, you’ll always know how best to approach a shot. I’ll discuss as briefly as possible, the three elements and explain what works for us.
We hope that this blog entry has been a useful read to you. Please feel free to contact us for one of our one-on-one or group workshops to take your photography to the next level. Details and costs are on this page.
Don’t forget to check in next Tuesday for part 2 of 3.
Have a great week and stay safe!